Introduction
In construction, carpentry, photography, and robotics, ensuring a surface is perfectly level is critical.
Traditional bubble spirit levels have been used for centuries, but the MPU6050 enables greater precision and automation.
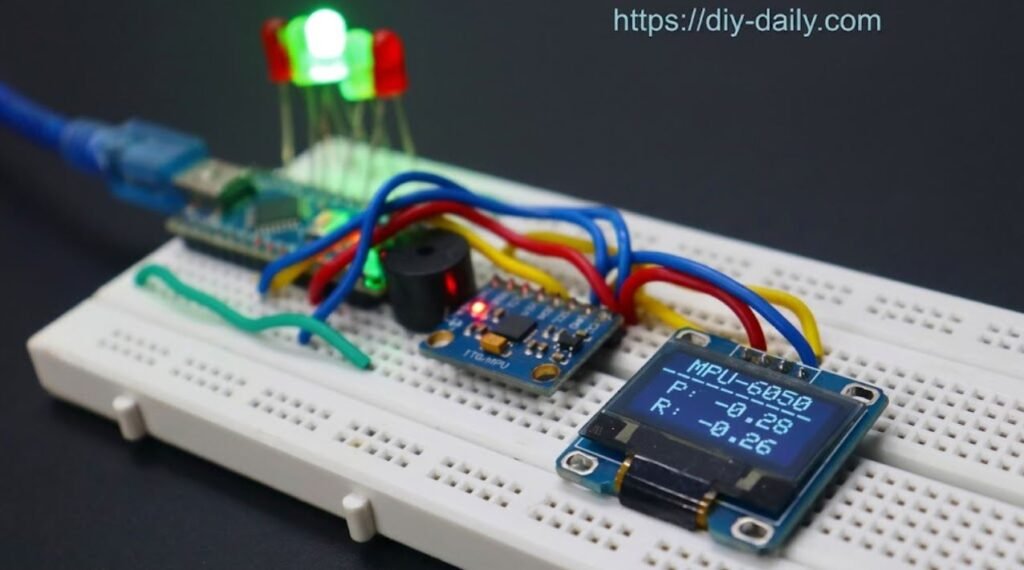
In this comprehensive tutorial, you will learn how to build your own DIY Arduino Digital Spirit Level. By combining an Arduino microcontroller, an MPU6050 accelerometer/gyroscope sensor, an OLED display, and visual LED indicators, this smart measuring device calculates real-time Pitch and Roll angles, displaying them numerically while warning you of alignment deviations.
Components Required
To assemble this project, gather the following hardware components:
- Arduino Board (Arduino Nano or Uno)
- MPU6050 6-Axis Accelerometer and Gyroscope Module
- 0.96-inch I2C OLED Display (128×64 pixels)
- Active Buzzer (for audio feedback when level)
- LEDs (Red, Green, Blue) with 220Ω current-limiting resistors
- Breadboard and Jumper Wires
- USB Cable for power and programming
Circuit Wiring Guide
Connect the components to your Arduino as follows:
- MPU6050 Module:
- VCC ==> 5V
- GND ==> GND
- SCL ==> A5 (SCL on Uno) / Pin 22 (on Mega)
- SDA==> A4 (SDA on Uno) / Pin 20 (on Mega)
- OLED Display (I2C):
- VCC ==> 3.3V or 5V (check module spec)
- GND ==> GND
- SCL ==> A5
- SDA ==> A4
- Indicators & Buzzer:
- Green LED ==> Digital Pin 4 (Indicates Level)
- Red/Yellow LEDs $\rightward Digital Pins 5 & 6 (Indicate Tilt)
- Buzzer ==> Digital Pin 7
Arduino Source Code
Below is the complete, production-ready Arduino code to run the digital level measuring device. Make sure you have installed the Adafruit GFX, Adafruit SSD1306, and Wire libraries via the Arduino Library Manager.
Arduino Code:
#include <Wire.h>
#include <Adafruit_GFX.h>
#include <Adafruit_SSD1306.h>

#define SCREEN_WIDTH 128
#define SCREEN_HEIGHT 64
#define OLED_RESET    -1
Adafruit_SSD1306 display(SCREEN_WIDTH, SCREEN_HEIGHT, &Wire, OLED_RESET);

// MPU6050 I2C address
const int MPU = 0x68;
float AccX, AccY, AccZ;
float pitch, roll;

// Pin definitions
const int greenLED = 4;
const int redLED = 5;
const int buzzer = 7;

void setup() {
  Serial.begin(115200);

  // Initialize I2C and MPU6050
  Wire.begin();
  Wire.beginTransmission(MPU);
  Wire.write(0x6B); // PWR_MGMT_1 register
  Wire.write(0);    // Set to zero (wakes up the MPU-6050)
  Wire.endTransmission(true);

  // Initialize OLED display
  if(!display.begin(SSD1306_SWITCHCAPVCC, 0x3C)) {
    Serial.println(F("SSD1306 allocation failed"));
    for(;;);
  }

  pinMode(greenLED, OUTPUT);
  pinMode(redLED, OUTPUT);
  pinMode(buzzer, OUTPUT);

  display.clearDisplay();
  display.setTextSize(1);
  display.setTextColor(SSD1306_WHITE);
  display.setCursor(0, 10);
  display.print("MPU-6050 Digital Level");
  display.display();
  delay(2000);
}

void loop() {
  // Read accelerometer data
  Wire.beginTransmission(MPU);
  Wire.write(0x3B); // Starting register for accelerometer readings
  Wire.endTransmission(false);
  Wire.requestFrom(MPU, 6, true);

  AccX = (Wire.read() << 8 | Wire.read()) / 16384.0;
  AccY = (Wire.read() << 8 | Wire.read()) / 16384.0;
  AccZ = (Wire.read() << 8 | Wire.read()) / 16384.0;

  // Calculate Pitch and Roll angles in degrees
  pitch = atan(AccX / sqrt(AccY * AccY + AccZ * AccZ)) * 180 / PI;
  roll = atan(AccY / sqrt(AccX * AccX + AccZ * AccZ)) * 180 / PI;

  // Update OLED Display
  display.clearDisplay();
  display.setTextSize(1);
  display.setTextColor(SSD1306_WHITE);
  display.setCursor(30, 0);
  display.print("MPU-6050");

  display.setCursor(10, 20);
  display.print("P: ");
  display.print(pitch, 2);
  display.print(" deg");

  display.setCursor(10, 40);
  display.print("R: ");
  display.print(roll, 2);
  display.print(" deg");

  display.display();

  // Check if surface is level (within a +/- 1 degree tolerance)
  if (abs(pitch) <= 1.0 && abs(roll) <= 1.0) {
    digitalWrite(greenLED, HIGH);
    digitalWrite(redLED, LOW);
  } else {
    digitalWrite(greenLED, LOW);
    digitalWrite(redLED, HIGH);
  }

  delay(100);
}