Introduction
Random numbers play a fundamental role in computing, cryptography, simulations, and interactive gaming. Whether you are building a digital lottery picker, an electronic board game companion, or a cryptographic key generator, having a reliable source of pseudo-random or true random values is essential.
In this comprehensive tutorial, you will learn how to build a compact, standalone Arduino Random Number Generator featuring a crisp I2C OLED display. By harnessing floating analog noise and microcontroller logic, this device generates and visualizes unpredictable numbers instantly at the push of a button.
Components Required
To assemble this DIY hardware project, gather the following components:
- Arduino Microcontroller (Arduino Nano, Uno, or Pro Mini)
- 0.96-inch I2C OLED Display (128×64 pixels)
- Push Button Switch (Tactile switch for triggering rolls/generations)
- 10kΩ Resistor (if not utilizing internal pull-ups)
- Breadboard and Jumper Wires
- USB Cable for power and programming
Circuit Wiring Guide
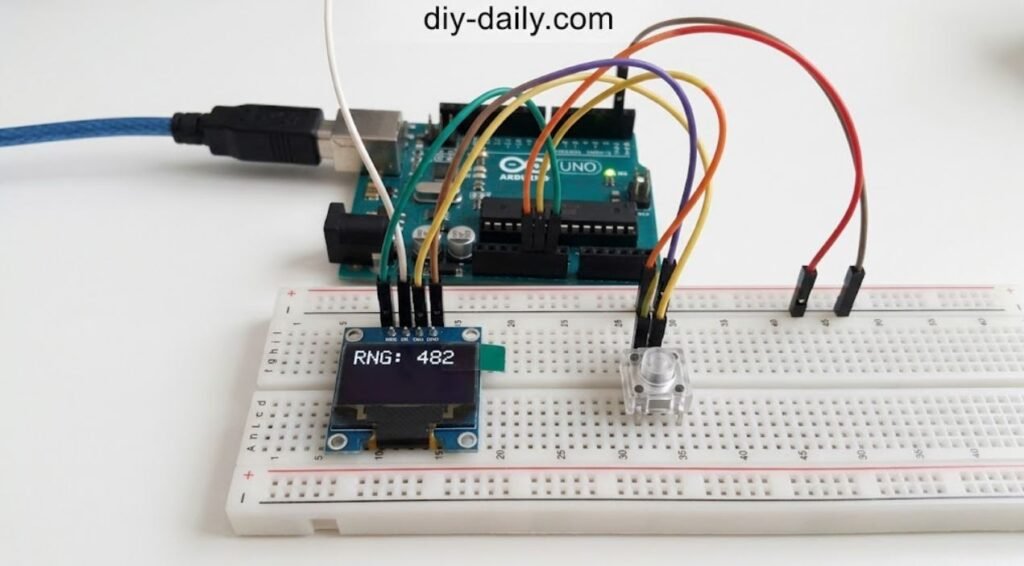
Connect the hardware components securely according to the following pin mapping:
- OLED Display (I2C):
- VCC ===> 5V (or 3.3V depending on module specs)
- GND ===> GND
- SCL ===> Analog Pin A5 (SCL on Uno/Nano)
- SDA ===> Analog Pin A4 (SDA on Uno/Nano)
- Push Button:
- One terminal ===> Digital Pin 2 (configured with
INPUT_PULLUP) - Other terminal ===> GND
- One terminal ===> Digital Pin 2 (configured with
Arduino Source Code
Below is the complete, production-ready Arduino sketch for the random number generator. Ensure you have installed the Adafruit GFX, Adafruit SSD1306, and Wire libraries through the Arduino IDE Library Manager before uploading.
#include <Wire.h>
#include <Adafruit_GFX.h>
#include <Adafruit_SSD1306.h>

#define SCREEN_WIDTH 128
#define SCREEN_HEIGHT 64
#define OLED_RESET    -1
Adafruit_SSD1306 display(SCREEN_WIDTH, SCREEN_HEIGHT, &Wire, OLED_RESET);

const int buttonPin = 2;
unsigned long randomValue = 0;

void setup() {
  Serial.begin(115200);

  // Initialize push button pin with internal pull-up resistor
  pinMode(buttonPin, INPUT_PULLUP);

  // Initialize I2C and OLED display
  Wire.begin();
  if(!display.begin(SSD1306_SWITCHCAPVCC, 0x3C)) {
    Serial.println(F("SSD1306 allocation failed"));
    for(;;);
  }

  // Seed the random number generator using floating noise from unconnected analog pin A0
  randomSeed(analogRead(A0));

  // Display Splash / Startup Screen
  display.clearDisplay();
  display.setTextSize(1);
  display.setTextColor(SSD1306_WHITE);
  display.setCursor(10, 15);
  display.print("Arduino RNG Device");
  display.setCursor(20, 35);
  display.print("Press Button to Gen");
  display.display();
  delay(2000);
}

void loop() {
  // Check if button is pressed (LOW state due to INPUT_PULLUP)
  if (digitalRead(buttonPin) == LOW) {

    // Generate a pseudo-random number between 1 and 1000
    randomValue = random(1, 1001);

    // Render results to the OLED display
    display.clearDisplay();

    display.setTextSize(1);
    display.setCursor(15, 5);
    display.print("RANDOM NUMBER:");

    display.setTextSize(2);
    display.setCursor(25, 30);
    display.print(randomValue);

    display.display();

    // Debounce delay to prevent multiple quick triggers
    delay(300);
  }
}How It Works
- Hardware Seeding (
randomSeed): Microcontrollers are deterministic machines and will generate the exact same sequence of pseudo-random numbers upon every reboot unless seeded properly. By reading electromagnetic and thermal noise from an unconnected analog pin (analogRead(A0)), the Arduino initializes with a unique seed every single time it powers on. - User Interaction: The tactile push button acts as the manual trigger. When pressed, it pulls the digital pin low, executing the
random(min, max)function. - Visual Output: The generated value is instantly mapped and rendered in large, legible text onto the 0.96-inch OLED screen via I2C communication.
Conclusion
Building this Arduino random number generator is an exceptional beginner-to-intermediate project that bridges basic electronic circuit wiring with practical programming concepts. Once verified on a breadboard, you can solder the circuit onto a perfboard or house it inside a custom 3D-printed enclosure for a polished, portable gadget!