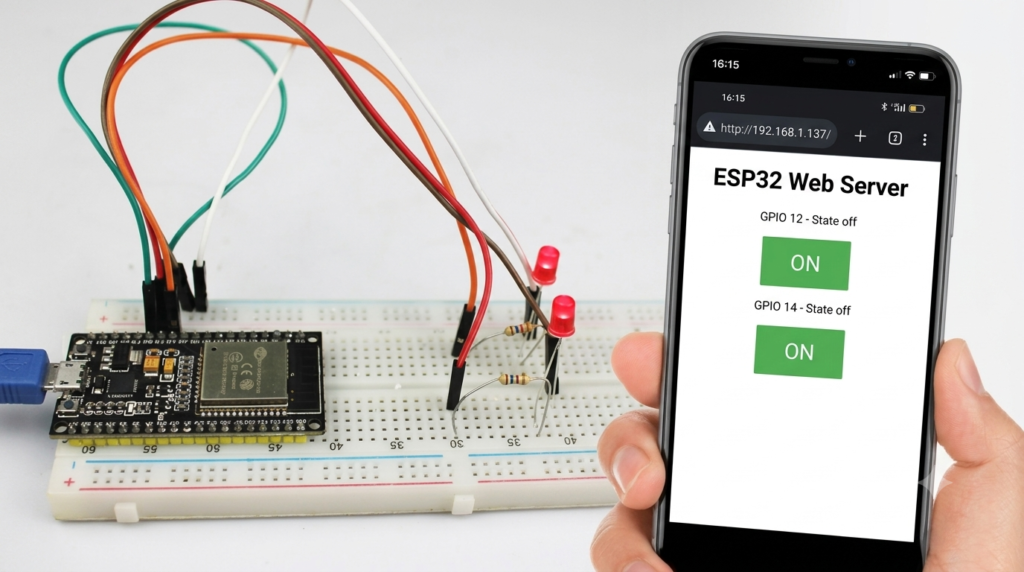
The ESP32’s superpower is built-in Wi-Fi, and the most satisfying first project is a tiny web server: open a page on your phone, tap a button, and an LED on your desk turns on. No cloud account, no app, no subscription — just your board, your network and about sixty lines of code. In this tutorial you will build exactly that, and along the way learn how HTTP requests actually work, because you will be parsing them by hand.
How It Works
Your ESP32 joins your home Wi-Fi as a station, gets an IP address from the router, and listens on TCP port 80 — the standard HTTP port. When your phone’s browser requests http://192.168.1.50/led/on, the ESP32 reads the request line, spots the path, flips a GPIO, and replies with a small HTML page. Your phone and the board only need to be on the same network; nothing leaves your house. The ESP32’s WiFiServer class (part of the Arduino core) does the socket plumbing, so our job is just: read the request, decide, respond.
Parts Needed
- ESP32 dev board (ESP32 DevKit, NodeMCU-32S or similar) with USB cable
- 1× 5 mm LED
- 1× 220 Ω resistor
- Breadboard and 2 jumper wires
- A phone or computer on the same Wi-Fi network
Wiring the LED
We use GPIO 2 because most dev boards also connect it to the on-board blue LED — you get a visual confirmation even before wiring anything.
| ESP32 | Component | Notes |
|---|---|---|
| GPIO 2 | 220 Ω resistor → LED anode | 3.3 V logic; resistor is essential |
| GND | LED cathode | Any GND pin works |
The Web Server Sketch
Install the ESP32 board package in the Arduino IDE (File → Preferences → Additional board URLs, then Boards Manager), select your board, fill in your Wi-Fi name and password, and upload:
#include <WiFi.h>

const char* SSID     = "YourWiFiName";
const char* PASSWORD = "YourWiFiPassword";
const int   LED_PIN  = 2;

WiFiServer server(80);

void setup() {
  Serial.begin(115200);
  pinMode(LED_PIN, OUTPUT);

  WiFi.begin(SSID, PASSWORD);
  while (WiFi.status() != WL_CONNECTED) {
    delay(500);
    Serial.print(".");
  }
  Serial.println();
  Serial.print("Open http://");
  Serial.println(WiFi.localIP()); // Note this address!

  server.begin();
}

void loop() {
  WiFiClient client = server.available();
  if (!client) return;

  String request = client.readStringUntil('r');
  Serial.println(request);

  if (request.indexOf("GET /led/on") >= 0) {
    digitalWrite(LED_PIN, HIGH);
  } else if (request.indexOf("GET /led/off") >= 0) {
    digitalWrite(LED_PIN, LOW);
  }

  bool on = digitalRead(LED_PIN);
  client.println("HTTP/1.1 200 OK");
  client.println("Content-Type: text/html");
  client.println("Connection: close");
  client.println();
  client.print("<h1>ESP32 LED</h1><p>LED is ");
  client.print(on ? "ON" : "OFF");
  client.print("</p><a href='/led/on'>ON</a> | ");
  client.println("<a href='/led/off'>OFF</a>");

  client.stop();
}
Walkthrough
After connecting, the board prints its IP — open that address in your phone’s browser. Each tap on the links requests /led/on or /led/off; indexOf() finds the path in the first line of the HTTP request (the only line we need), the GPIO flips, and we send back a minimal but valid HTTP response. The blank line after the headers is mandatory — it is what tells the browser the body has begun.
Making It Nicer
Replace the links with two big styled buttons by embedding a little CSS in the response string. Add a /status.json route returning {"led":1} and you have the start of a real API that other scripts and home-automation tools can poll. You can also serve a favicon route returning 204 No Content to keep the browser from logging errors on every visit. For production-style code, graduate to the WebServer or ESPAsyncWebServer libraries, which parse routes for you — but building this raw version first means you understand what those libraries are doing underneath.
What the Browser Actually Sends
Open the Serial Monitor while you tap the phone buttons and you will see the raw request line: GET /led/on HTTP/1.1 followed by headers like Host: and User-Agent:. Our sketch only reads the first line and ignores the rest, which is all this project needs — but it explains real bugs you will meet later. Favicon requests (GET /favicon.ico) arrive uninvited with every page load; browsers on phones sometimes send the request twice when the first response feels slow; and query strings (/led?state=on) live inside that same first line. When you graduate to the WebServer library, its route table, argument parsing and 404 handling are simply polished versions of the string matching you did by hand here — which is exactly why this exercise is worth doing once, slowly, by eye.
Troubleshooting
- Stuck printing dots: wrong SSID/password, or the network is 5 GHz — ESP32 only supports 2.4 GHz.
- Browser cannot reach the IP: phone and board must share the same network; guest Wi-Fi often blocks device-to-device traffic.
- Page loads once, then never again: ensure
client.stop()runs and the browser is not reusing a dead connection; the “Connection: close” header handles this. - Random resets: power the board from a good 5 V source; Wi-Fi bursts need 300–500 mA, more than weak USB ports supply.
Safety Notes
- Anyone on your network can toggle this LED — fine for a demo, but add authentication before controlling anything that matters.
- Never expose port 80 of this sketch to the internet via router port-forwarding; it has zero security.
- 3.3 V GPIO: always use the series resistor with LEDs, and never feed 5 V into an ESP32 pin.
Conclusion
You have a phone-controlled light built from three components and a sketch you fully understand. Every ESP32 project with a web interface — thermostats, robot controls, config dashboards — grows from this skeleton. Next, combine it with a DHT22 and your phone becomes a weather station display.